How To Optimize HTML Heading Tags In Blogger
How to Optimize The H1, H2, and H3 Heading Tags In Blogger Templates - Each template has a different structure according to the template developer itself. Some are just showing the beauty while some are using the search engine optimization (SEO) techniques.
Improving the heading tag structure will make the blogs SEO friendly and makes it easier for search engine bots to index the titles as well as the content of the webpages that we create for different purposes.
Pay Attention: The Latest Version of Blogger Conditional Tags
Before starting to improve the heading tags in your blog theme, let's understand the meaning of heading tags first. Here is the clear structure of heading tags H1, H2, and H3.
What Are HTML Heading Tags?
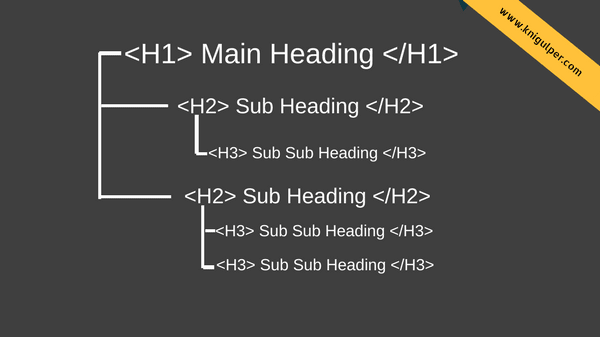
Heading tags are the HTML tags which humans and search engines use to scan the main keywords of a webpage. A heading (H1) tag is used in a post title while subheading tags can be used on a webpage to organize the content sections. Long blog posts are usually divided into different or many sections and we use the subheadings to give a proper structure for our long contents. Creating the proper titles and subtitles on a webpage which we includes in our template will help the search engine bots and readers understand the contents more efficiently.
Recommended: 10 Killer Tips to Increase Website Domain Authority
The Importance of Heading and Subheading Tags and How to Use?
Headings tags are one of the most vital elements for developing your SEO friendly webpages. Furthermore, it provides a user friendly interface for your websites and blogs. Search engines love H1 and H2 tags because it showcases the important keywords you have selected. The use of heading tags are not new but over the last years Google is giving the more importance on the text enclosed with H1 tags. The best practice for using the H1 tag is the title of an article. The text inside the H1 tags should be your primary keyword(s) that you are targeting. By placing an anchor link inside the h1 tags, it gives search engines the impression that the keyword and page are very important.
Sometimes, we attempt to get the more and more traffic from search engines in a greedy manner by using the H1 tag blindly which finally results the black hat SEO method. If you really want to send the white hat signal to search engines, then never overuse or stuff your pages with H1. Better major advantage of using the proper H1 tag is to provide a great boost to your SEO.
<title>Blog Title</title>
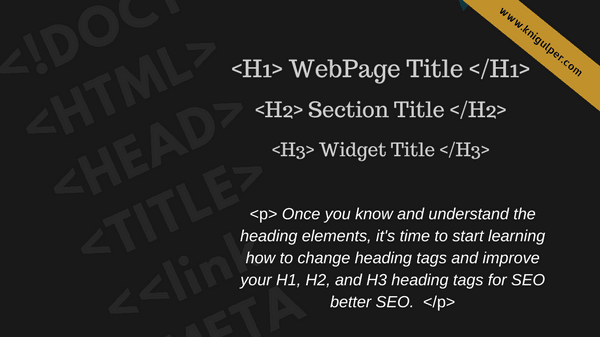
<h1>WebPage Title</h1>
<h2> Post Heading </h2>
<h3> Widget Title </h3>
How To Change H1, H2, and H3 Heading Tags?
Once you know and understand the heading elements, it's time to start learning how to change heading tags and improve your H1, H2, and H3 heading tags for better SEO.
- Login to Blogger Template > Edit HTML and Search this code
- Now find the following codes then replace h3 to h2
- Now change the heading tag for the widget. Find the following code and change H2 to H3. It does not matter if you do not want to change it, but to be more SEO friendly just replace the widget title tags.
- Locate the following markup and replace the H2 tag with H1
- Save your template after completing the above mentioned steps and you are on the go
<b: if cond = 'data: post.title'>
If you find the above code more than one times, just replace the all occurrences from h3 to h2.
<b:if cond='data:post.title'>
<h3> Being Replaced <h2>
<b:if cond='data:post.link'>
</h3> Being Replaced </h2>
</b:if>
<div class='mobile-post-outer'>
<a expr:href='data:post.url'>
<h2 class='mobile-index-title entry-title'>
<data:post.title/>
</h2>
Note: In some templates there will be additional codes using the schema markup like itemprop = ' name' and replace these codes as well from h3 to h2.
<!-- only display title if it's non-empty -->
<b:if cond='data:title != ""'>
<h3 class='title'>
<data:title/>
</h3> </b:if>
<h1 class='post-title entry-title' itemprop='name'>
Note: This the the important step. Any misunderstanding will make your blog title look very bad in SEO industry. So, avoid the mistakes and follow the step carefully.
Try to backup the template before you make any changes to the heading tag of your blog. If you make any error when you change the heading tags in your template, you can comfortable restore your template to its previous state.


May you help me optimise the heading tag of my blog title, please?
ReplyDeleteThe blog title became too small.