Auto Numbering Popular Posts Widget for Blogger

In this tutorial i will share how add a popular posts widget in your blog with Thumbnail and auto numbering. Blogger popular posts widget shows the most clicked and most visited posts in your blogger. This widget have been created with CSS elements. The widget is easy customizeable. Blogger popular posts widget is a most important element for your blogger blogs. This widget help your visitors to find most viewed or most discussed posts.
Check out: How to Add Responsive Related Post Widget to Blogger
Today i am sharing a popular posts widget for blogger blogs that show popular posts of your blog thumbnail with auto numbering. Using this custom popular posts widget, you can make your popular posts widget more unique that is important in your blog.
Pay Attention: How to Add 15+ CSS3 Transitions and Animations to Blogger
Adding Auto Numbering Popular Posts Widget to Blogger
- Go to your blogger Dashboard >Template > Edit HTML
- Copy the CSS code and add it just above the ]]></b:skin>. and Save your template
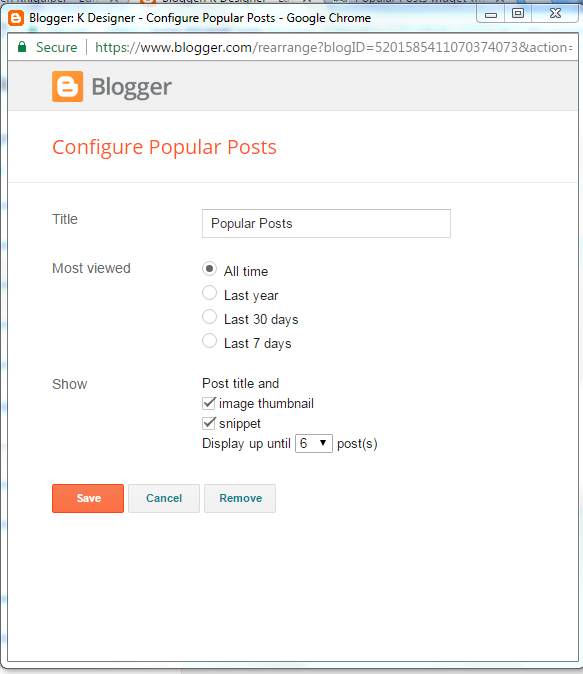
- Now go to Layout > Add a gadget > Popular Posts and configure it as shown in this screenshot.
- And finally, hit Save button
/* CSS Popular Post */ .PopularPosts ul,.PopularPosts li,.PopularPosts li img,.PopularPosts li a,.PopularPosts li a img{list-style:none;border:none;background:none;outline:none;margin:0;padding:0} .PopularPosts ul{list-style:none;font-family:'Oswald',Sans-Serif;font-size:13px;color:#919392;margin:.5em 0} .PopularPosts ul li img{display:block;width:70px;height:70px;float:left;margin:0 15px 0 0; border: 1px solid silver;padding: 2px;} .PopularPosts ul li{background-color:#eee;counter-increment:num;position:relative;margin:0 10% 0 0;padding:10px} .PopularPosts ul li:before,.PopularPosts ul li .item-title a{font-weight:700;font-size:13px;color:#919392;text-decoration:none;transition:.5s linear; font-family: Open Sans;} .PopularPosts ul li:before{content:counter(num);display:block;position:absolute;background-color:rgb(247, 73, 73);color:#fff;width:30px;height:28px;line-height:25px;text-align:center;bottom:0;right:0;margin-top:15px;transition:.5s linear; border-radius: 10%;font-size: 18px; padding: 5px;} .PopularPosts ul li:nth-child(1),.PopularPosts ul li:nth-child(2),.PopularPosts ul li:nth-child(3),.PopularPosts ul li:nth-child(4),.PopularPosts ul li:nth-child(5),.PopularPosts ul li:nth-child(6),.PopularPosts ul li:nth-child(7),.PopularPosts ul li:nth-child(8),.PopularPosts ul li:nth-child(9),.PopularPosts ul li:nth-child(10){background:#fff;color:#aaacab; border-bottom:1px solid #EFEFEF;transition:all .5s linear;} PopularPosts ul li:last-child{border-bottom:none;} .PopularPosts ul li:hover:nth-child(1),.PopularPosts ul li:hover:nth-child(2),.PopularPosts ul li:hover:nth-child(3),.PopularPosts ul li:hover:nth-child(4),.PopularPosts ul li:hover:nth-child(5),.PopularPosts ul li:hover:nth-child(6),.PopularPosts ul li:hover:nth-child(7),.PopularPosts ul li:hover:nth-child(8),.PopularPosts ul li:hover:nth-child(9),.PopularPosts ul li:hover:nth-child(10){background-color:#fafafa;transition:all .5s linear;} .PopularPosts ul li:hover .item-title a{color:#37B576;transition:all .5s linear;} .PopularPosts ul li:hover:before{background-color:#37B576;color:#fff;transition:all .5s linear;} .PopularPosts .item-thumbnail{float:left;margin:0 0 0 10px;} .PopularPosts ul li .item-snippet {display:none;visibility:hidden;opacity:0;font-size:11px;color:#383838;transition:all .5s linear; font-family: Open Sans;} .PopularPosts ul li:hover .item-snippet {display:block;visibility:visible;opacity:1;transition:all .5s linear;}


I used this in my blog. I want to increase width of the thumbnail but when I increase, image is streching. How can I correct it?
ReplyDeleteHello Ramachandra! Could you please give me your blog URL?
DeleteYou must increase the both width and height as well and keep the dimensions same. example: width:80px;height:80px
DeleteOk. Thank you for your quick response. But I have used landscape like images which is not square. It will be cropped!!! So any other way? By blog is http://www.shrisutha.com
ReplyDeleteThanks for your good compliment! Then you should keep the height greater than width.
DeleteExample: width:70px;height:75px
Additionally, you can make your thumbnails rounded by making a little change in css. Find the following code undefinedit can be located in the first line) .PopularPosts li a img{list-style:none;border:none;background:none;outline:none;margin:0;padding:0; . Replace the above mention code by the given snippets. .PopularPosts li a img{list-style:none;border:none;background:none;outline:none;margin:0;padding:0;border-radius:50%;}
Failed to display full image so,I used border-radius:50%. Looks better. Thanks you.
Delete*Thank you
DeleteYou're most welcome! Glad to know that it worked for you. Keep visiting. Thank you
DeleteMy pleasure ☺
Delete