How to Get Official HTTPS For Blogger Custom Domain
How to Migrate From HTTP to HTTPS on Blogger Blog With Custom Domains - Have you moved your BlogSpot blogs to HTTPS? If not, then you can migrate from insecure web version to secure one as Google has recently provided an opportunity for blogger users to enable this feature for custom domains. Google has probably considered SSL as a major ranking factor for blogs and websites that's why they gifted SSL certificates to Blogger users for free of charges.
In the past, we had to purchase the SSL certificates for self-hosted domains due to its unavailability in blogger.com but today, Google has enabled this amazing feature on our blogs for free of cost. The SSL certificates not only make our blogs look professional but will also help to win the trust of our visitors, readers, and advertisers. Lets me discuss the advantages of having secure connection.
Why Do I Need SSL?
HTTPS provides more web security as compared to HTTP as it uses Secure Sockets Layer. While deploying HTTPS, you can ensure your website users about the security regarding their personal data. If you own an e-commerce website, it would be most important for you to build credibility and reliability by offering data protection to your visitors. HTTPS can offer secure DNS infrastructure to a large extent. On the contrary, HTTP does not offer the same level of security about DNS infrastructure.
Check out: How To Optimize On-Page and Off-Page SEO
The encryption in HTTPS provides a number of benefits including integrity, identity, and confidentiality. You can understand in such a way that either you are sharing photos on Facebook with security controls or giving control to someone to share your photos on Facebook. HTTPS provides more security to browsers. It means that you can offer fewer opportunities to hackers while using HTTPS as a communication and server channel.
Also read: Redirecting to www or non-www in blogger
The use of an SSL certificate on a website is usually indicated by a padlock icon in web browsers but it can also be indicated by a green address bar. Millions of online businesses use SSL certificates to secure their websites and allow their customers to place trust in them.
Steps to Enable Official HTTPS On Custom Domain
Have you ever noticed https for custom domains is now available on your blog in your blogger dashboard? Yes! You might have seen this message when you map a custom domain to your blogger. It means SSL is officially available for all blogger users worldwide with custom domains.
- Go to draft.blogger.com
- Log in with your current Gmail account
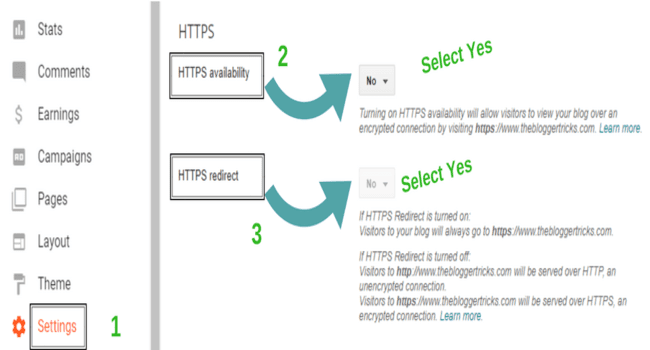
- Navigate to Settings option > HTTPS
- Just under the HTTPS option, you will see HTTPS availability and HTTPS redirect
- In the drop-down menu, select Yes
- After you turn it ON, your dashboard page will reload automatically
- Comeback after an hour and select Yes under the HTTPS redirect
At this step, you will see the following messages
Under the HTTPS availability: HTTPS Availability is being processed. Try again later
Under the HTTPS redirect: This setting is unavailable while HTTPS Availability is processing. Try again later
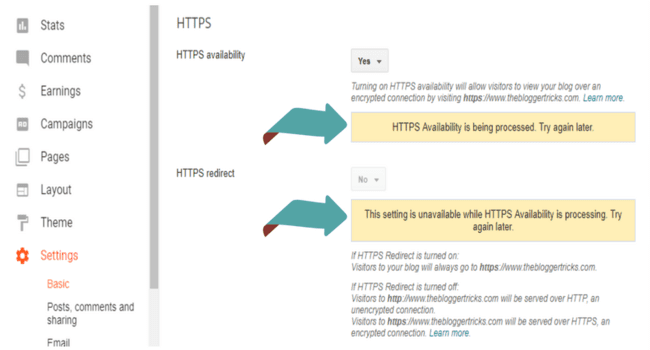
It means your HTTPS request is under process
If your blog displays a padlock icon in the address bar, then you have fully activated the SSL on your blog. However, if you see a green address bar icon then you have to follow the below-mentioned steps.
How to Deal With Mixed Content Issues
When we have mixed contents in our templates, our blog URL shows green address bar icon. It means you have to replace all HTTP links with HTTPS within your theme editor. When you finish this step, you will see a padlock icon next to your blog address. If you are still seeing a green address bar icon, then update your Google Adsense Ad code and also go to your blog homepage and press Ctrl + Shift + J (chrome) to find the mixed content issues.
Mixed Content Error Over Secure Connection: Mixed content error usually occurs due to the presence of insecure Feedburner URL in our BlogSpot templates. So, all you need to find your FeedBurner address from the theme editor, and then replace the URL prefix with HTTPS.
Have a look at both versions...
Insecure FeedBurner URL:
http://feedburner.google.com/fb/a/mailverify?uri=username
Secure FeedBurner URL:
https://feedburner.google.com/fb/a/mailverify?uri=username
How To Replace All HTTP Internal Links With HTTPS At Once
You might have published the lots of contents on your blog and in this case, your internal links that you have linked to your web pages start with HTTP. To turn all the HTTP URLs into https, just add the given jQuery code above the </body> and you are all set.
<script type='text/javascript'>
//<![CDATA[
// Replace all HTTP to HTTPS
jQuery('a').each(function() { this.href = this.href.replace("http:", "https:"); });
//]]>
</script>
AdSense Ads Are Not Showing On HTTPS
When you migrate your website URL from insecure version to SSL, your Adsense ads will stop showing on your blogs. In this case, generate your new ad code from your Adsense account to keep ads running. You can also make few changes in your old Ad codes by removing the HTTP prefix.
Old Code:
<script async='' src="https://pagead2.googlesyndication.com/pagead/js/adsbygoogle.js">
By removing the HTTPS from your Ad code, your code will work on both versions such as secure and insecure website.
New Code:
<script async='' src="//pagead2.googlesyndication.com/pagead/js/adsbygoogle.js">
Please refer to this official article for more details.
Replacing Your HTTP Files With HTTPS
When you finish all the steps, its time to update your robots.txt file. For that, you need to navigate the Settings > Search preferences and under the Crawlers and indexing locate the Custom robots.txt.
Click the Edit link and replace your existing URL with the new one.
Old Custom robots.txt:
User-agent: Mediapartners-Google
Disallow: User-agent: *
Disallow: /search
Allow: / Sitemap: http://www.yourblog.com/sitemap.xml
New Custom robots.txt:
User-agent: Mediapartners-Google
Disallow: User-agent: *
Disallow: /search
Allow: / Sitemap: https://www.yourblog.com/sitemap.xml
When you finish this step, log in to your Search Console account and delete the old property. Now you have to add the new property with HTTPS and submit your XML sitemap to Google, Bing, and Yahoo.
If you face any problem regarding this tutorial, please feel free to leave your comments. I will be happy to help you out.


This blog is it created with blogger or with other blogs builder.!!
ReplyDeleteMy lovely blogger.com
DeletePlease this https tutorial is it exactly what your using?....
ReplyDeleteYes buddy! i am too using the Blogger's default SSL
DeleteIt works. Thank you sir. But I face a problem here, now my adsense ads are not showing, why?
ReplyDeleteMy ad problem solved. Thank you for this valuable info
ReplyDeleteYou're welcome!
Deletevery nice information Brother thanks for sharing this article
ReplyDeletethanks a lot bro
DeleteThank you for sharing a great article. But when we are selecting yes in https availability then https redirect is not active after 1 day
ReplyDeleteNormally, Google takes upto 2 hours to process the HTTPS request. But later, if you switch back to the HTTP, then it takes 24 hours or more for HTTPS Redirect to get activated.
DeleteYou have said that we should delete old HTTP version from search console but I read somewhere it is not necessary.
ReplyDeleteIt's important to delete the non-HTTP property. If you keep the non HTTP property as well as HTTPS, it may conflict the duplicate contents issues. So, you must delete the old property before you add SSL enabled URL.
Delete